Breaking

Sunday, February 3, 2019

February 03, 2019

SLUMP TEST OF CONCRETE | HOW TO DO SLUMP TEST OF CONCRETE AT SITE

SLUMP TEST OF CONCRETE | HOW TO DO SLUMP TEST OF CONCRETE AT SITE                                     


OBJECTIVE:                                                                                                          
This method of test specifies the procedure to be adopted, either in the laboratory or in the field during work, for determining the workability of concrete where the nominal maximum size of aggregate does not exceed 38 mm.                                                                                                           
SLUMP TEST OF CONCRETE | HOW TO DO SLUMP TEST OF CONCRETE AT SITE
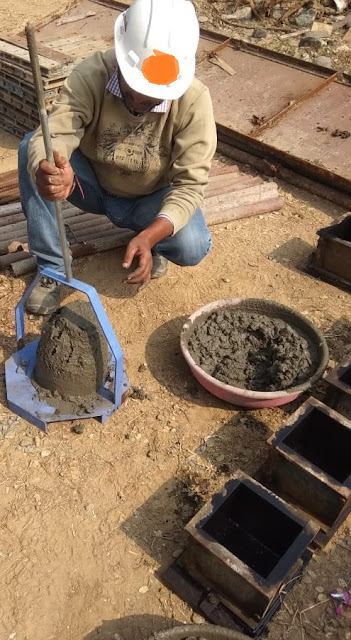
Slump test

APPARATUS:                                                                                                         
Metal slump cone of at least 1.6mm thickness provided with a suitable base plate and also handles for lifting it from the moulded concrete test specimen vertically                                                                                                 

Internal dimension of the cone should have the following sizes:                                                                                                      

                        Bottom diameter     - 20 cm                                                                           
                        Top diameter          - 10 cm                                                                            
                        Height                     - 30 cm                                                                           

            Tamping rod of 16 mm diameter 0.6m long and rounded at one end.                                                                                              
PROCEDURE:                                                                                                        
1. Firstly decide the frequency of slump value to be taken during concreting.                                                                                                         
2. Oil the interior surface of the slump cone with a mould releasing oil to prevent adhesion of the concrete.                                                                                                
3. Place the slump cone on a levelled surface.                                                                                                
4. Collect the sample thoroughly in a wheelbarrow with sampling scoop.                                                                                                      
5. Remix the sample thoroughly in a wheelbarrow with sampling scoop.                                                                                                        
6. After remixing immediately fill the slump cone in layers approximately one- quarter of the height of the cone.                                                                                                   
7. Each layer shall be compacted with the tamping rod by 25 strokes distributed in a uniform manner over the cross-section of the cone and for the second and subsequent layers tamping rod shall penetrate into the underlying layer.                                                                                                        
8. After compacting the top layer, the concrete shall be struck off level the top of the slump cone, using a trowel. Any mortar, which may have leaked out between the mould and the base plate, shall be cleaned away.                                                                                                           
9. Unscrew the slump cone from the base plate and remove it immediately from the concrete by raising it slowly and carefully in a vertical direction.                                                                                                   
10. After the concrete subsides place the slump cone on the plate in a reverse position and places a scale on it. Measure the height between the top of the mould and the highest point of the specimen being tested.                                                                                                      


REPORTING OF SLUMP VALUE:                                                                                                        
The slump measured shall be reported in terms of a millimetre of subsidence of the specimen during the test. Any slump specimen, which collapses or shears off laterally, shall be repeated with another sample. If in the repeat test also, the specimen shears the slump shall be measured and the fact the specimen sheared shall be reported. Take corrective action to make the mix cohesive.                                                                                                  

                                    
February 03, 2019

MAKING AND CURING CONCRETE CUBES AS PER IS:516-1959

MAKING AND CURING CONCRETE CUBES AS PER IS:516-1959


OBJECTIVES:                                                                                                        
This method covers the procedure or making and curing of concrete cubes as per IS: 516- 1959.                                                                                   
                
APPARATUS:                                                                                                         
Wheelbarrow, sampling scoop, trowel, cube mould of 15x15x15 cm size and tamping bar 16mm in diameter, 0.6 m long and bulleted point at the lower end.                                                                        


PROCEDURE:                                                                                                        
1. Decide the number of samples to be taken during concreting (as per table no. 15.2.2 of IS: 456-2000)                                                                                                  
2. Oil the interior surface of the mould with a mould releasing oil to prevent adhesion of concrete.                                                                                                 
3. Collect the sample in a wheelbarrow after mixing the concrete properly in the transit mixture.                                                                                                  
4. Remix the sample thoroughly in a wheelbarrow with sampling scoop.                                                                                                       
5. After remixing immediately fill the mould in layers approximately 5 cm deep.                                                                                                   
6. During filling the mould, the scoop shall be moved around the top edge of the mould as the concrete slides from it in order to ensure a symmetrical distribution of the concrete within the mould.                                                                                                      
7. Each layer shall be compacted with the tamping rod by minimum 35 strokes distributed in a uniform manner over the cross-section of the mould.                                                                                                  

8. After compacting the top layer, the top surface of the concrete shall be finished level with the top of the mould using a trowel.                                                                                                            

9. Store the cube moulds in a place which is free from vibration and cover the surface of the concrete with a piece of damp sacking for initial 16 to 24 hours.                                                                                                       


Saturday, January 19, 2019

January 19, 2019

Testing of Cement before concreting at the site / What are the site test you can do of cement before concreting

Testing of Cement before concreting at the site / What are the site test you can do  of cement before concreting


1. DATE OF PACKING
Date of manufacture should be seen on the bag. It is important because the strength of cement reduces with age.
2. COLOUR
The cement should be uniform in colour. In general the colour of cement is grey with a light greenish shade. The colour of cement gives an indication of excess lime or clay and the degree of burning.
3. RUBBING
Take a pinch of cement between fingers and rub it. It should feel smooth while rubbing. If it is rough, that means adulteration with sand.
4. HAND INSERTION

Thrust your hand into the cement bag and it should give a cool feeling. It indicates that no hydration reaction is taking place in the bag.
5. FLOAT TEST
Throw a small quantity of cement in a bucket of water. It should sink and should not float on the surface.
6. SMELL TEST
Take a pinch of cement and smell it. If the cement contains too much of pounded clay and silt as an adulterant, the paste will give an earthy smell.
7. PRESENCE OF LUMPS
Open the bag and see that lumps should not be present in the bag. It will ensure that no setting has taken place.
8. SHAPE TEST
Take 100g of cement and make a stiff paste. Prepare a cake with sharp edges and put on the glass plate. Immerse this plate in water. Observe that the shape shouldn’t get disturbed while settling. It should be able to set and attain strength. Cement is capable of setting under water also and that is why it is also called ‘Hydraulic Cement’.
9. STRENGTH TEST
A block of cement 25 mm*25 mm and 200 mm long is prepared and it is immersed for 7 days in water. It is then placed on supports 15000 mm apart and it is loaded with a weight of 340 N. the block should not show any sign of failure.

Monday, January 14, 2019

January 14, 2019

The initial Setting time of the Cement testing procedure in details

The initial Setting time of the Cement testing procedure in details

picture of vicat apparatus

OBJECTIVE:

This method covers the testing procedure for determining the initial setting time of cement.


APPARATUS:

Vicat apparatus conforming to IS: 5513-1969 with dashpot, non-absorbent mixing plate, measuring cylinder, gauging
trowel and stopwatch.

PROCEDURE:

1. Take the Vicat apparatus and fit the standard consistency plunger (needle type). Lower the stem and check if the reading
is zero when the plunger touches the non-porous resting plate (glass plate). If not adjust it to zero.
2. The temperature of cement and water and that of the testing room shall be preferably within the range of temperature
3. Coat the non-porous resting plate (glass plate) with petroleum jelly. Place the mold after coating lightly with petroleum
jelly on the non-porous resting plate (glass plate)
4. Take 300 g of cement.
5. Prepare a neat cement paste mixed with water which is 0.85 times that of standard consistency (i.e. standard consistency
=30%). Water for initial setting time =0.30x300x0.85= 76.5 ml.
6. The time from adding water to dry cement until starting to fill the Vicat Mould should be within 3 to 5 minutes.
7. Start the stopwatch as soon as you start adding water and mixing the cement paste. The mixing should be done using
stainless steel trowel which is available with lab equipment dealers.
8. Fill the vVicat Mould completely with the cement paste made and smooth off the surface of the paste make it level to the
top of the Mould.
9. Place the Mould under the needle (1 mm square) together with a non-porous resting plate and cement paste make it level to
the top of the Mould.
10. Lower the needle gently to touch the surface of the block and release quickly. Make sure that the dashpot works
properly.
11. Initially, the needle will pierce completely into the test block .Repeat this procedure until the needle fails to penetrate
into the test block by 5± 0.5 mm from the bottom of the mould.
12. The time started from mixing water to the cement to the time when the needle fails to penetrate test block by 5 ± 0.5
mm is described as the initial setting time.

Friday, January 11, 2019

January 11, 2019

CRAZING OF CONCRETE AND THE REMEDIAL MEASURES FOR CRAZING OF CONCRETE

CRAZING OF CONCRETE AND THE REMEDIAL MEASURES FOR CRAZING OF CONCRETE
SUBRATA PAUL | CRAZING | 12-01-2019

 
What is Crazing of Concrete?

Crazing is the development of random fine cracks on the surface layer of concrete or mortar due to shrinkage of the surface layer. These cracks are intensively seen in floor and slab surface.
These cracks generally about 3mm deep and length, not more than 40mm. Sometimes these cracks are not visible in dry condition but when they are wetted, they become visible. These cracks do not affect the durability of the concrete nor the permeability and water resistance. Also, there is no effect on structural integrity due to crazing.


 Preventive Measures for Crazing of concrete:

v Troweling the surface as little as possible particularly avoiding using of steel float for finishing. Instead of steel float use Wooden float for finishing.
v Avoiding the use of neat cement powder for finishing of the concrete surface would prevent the crazing of concrete.
v Also avoid the rubbing the surface with neat cement paste, after finishing.
v Sometimes over vibrating the fresh concrete may result in bringing too much cement slurry on the top surface of concrete and this has a tendency of shrinkage which causes of crazing of concrete.
v Using of the low water-cement ration as much as possible to avoid crazing. 

Wednesday, January 9, 2019

January 09, 2019

What is Concrete and what properties Fresh concrete should have and should not have

What is Concrete and what properties Fresh concrete should have and should not have

What is Concrete?


Concrete is a composite mixture of fine aggregate (usually sand), coarse aggregate (usually stone ballast) and binding material (usually Portland cement) mixed together with a required proportion of water, which hardens over time.
Sometimes suitable admixtures are mixed with concrete to enhance certain properties of concrete like workability, setting time and heat production.


Properties of Fresh Concrete Should have –

Fresh Concrete is the concrete when it is still in plastic stage i.e. not yet set. must have some properties to mold it into a shape we want, These properties are listed below –
  • Workability:  

    Fresh Concrete should have good workability. Workability is defined as the ease with which it can be mixed, transported and placed in position in a homogeneous state. The workability of concrete depends on the quantity of water, percentage of fine aggregate, and grading of aggregates. For heavily reinforced concrete more workable concrete required than lightly reinforced concrete.

Properties of Fresh Concrete Should not have –

  • Segregation:

Segregation of Concrete results in the honeycomb in concrete as well as loss of strength in hardened concrete. Honeycomb is the breaking of Cohesion i.e. separation of coarse aggregate from the mass of concrete.
  • Bleeding :

Bleeding of  Concrete is also very harmful to concrete. Bleeding happens when water or water-cement mixture separates from fresh concrete mix. Bleeding results in exposed aggregate surface and less strength in the hardened concrete. bleeding occurs when water cement ration in fresh concrete is much more than usual.
January 09, 2019

Plastic shrinkage cracks in concrete and the Preventive measures for Plastic Shrinkage Cracks

Plastic shrinkage cracks in concrete and It's Preventive measures 

Plastic Shrinkage Crack 

When finish concrete is subjected to a rapid loss of moisture from its surface this type of crack observed. These cracks are not very deep (20 to 25 mm) and long (200 to 500 mm long) and can affect a large portion of the concrete surface. 


Picture of Plastic shrinkage crack in concrete


Causes of Plastic Shrinkage Crack :

Plastic shrinkage crack is the result of high shrinkage (reduction in volume) of the upper surface of concrete from its underlying layer.
  • Ambient concrete temperature and low relative humidity. 
  • Very windy weather
  • Finishing of concrete surface with rich cement 
  • Excess amount of sand in concrete 
  • Improper curing

Preventive Measures for Plastic Shrinkage Crack:

  • Early curing of concrete (after final set)
  • Spraying of curing compounds / fog-spray immediately after finishing.
  • Providing windbreaks to decrease the wind velocity.
  • Covering the surface with think tarpaulin sheet or sunshades to reduce the temperature.
  • Discouraging over sanded mix


Monday, January 7, 2019

January 07, 2019

How to calculate Concrete Raw Materials Measurement box sizes at the site

How to calculate Concrete Raw Materials Measurement box sizes at the site

For manual batching of concrete raw materials at a site in correct proportion, concrete raw material measuring boxes are used. This method of batching is generally used where a small quantity of concrete to be prepared using stacked raw materials. This is a volume batching and it should not be practised when weight batching is available to avoid less deviation.
Picture of concrete measuring box

General Requirments: 

To calculate measuring box sizes we need to do the mix design and find out the quantity of cement, sand, and aggregate (both 20 and 10mm) to be used in one cubic meter of concrete. We also need to calculate the bulk density of raw materials (sand and aggregates) as well as bulking of sand at the site.

Calculations:

Let's assume for 1 cubic meter of concrete the required quantity of raw materials are- 
Cement - 337.5 kg
Sand - 723 kg
Coarse aggregate - 1200 kg (65% 20mm and 35% 10mm)

 Now let's assume these followings - 
The bulk density of sand - 1445 kg/cm
The bulk density of coarse aggregate - 1408 kg/cm

Now let's calculate the required quantity of raw materials for 1 bag (50kg) of cement, 
Note: Generally this type of batching is done with respect to 1 bag cement.

now 337.5 kg cement = 6.75 bags of cement
for 6.75 bags of cement, the sand quantity is 723 kg
for 1 bag of cement the quantity of sand is (723/6.75)= 107.11 kg
and coarse aggregate is (1200/6.75)= 177.78 kg 
In which 20mm aggregate is (177.78x(

Now the volume of 107.11 kg sand = (107.11/1445)cum=0.07412 cum=
and volume of 177.78 kg aggregate=(177.78/1408)cum=0.12626 cum (20mm -0.082069 cum, 10mm-0.044191cum)

let's assume the length and breadth of the box is 300mm and 300mm and height x, and we need to mix 2 box of sand and aggregate (both 20 and 10mm) for 1 mix, 
now for sand x is =0.07412/2*(0.3*0.3)= 0.411m = 411 mm
and for the coarse aggregate of 20mm size x is = 0.082069/2*(0.3*0.3)= 0.455m = 455mm
and for coarse aggregate of 10mm size is = 0.044191/2*(0.3*0.3)=0.245m = 245 mm


So the sizes of the measuring boxes and mix proportion for 1 bag of cement will be - 
For Sand - 300mm x 300mm x 411mm (2 box)
For 20 mm CA - 300mm x 300mm x 455mm (2 box)
for 10 mm CA - 300mm x 300mm x 245mm (2box)


Picture of Batching with concrete raw materials measuring boxes
Batching with concrete raw materials measuring boxes


Saturday, January 5, 2019

January 05, 2019

What Properties Harden Concrete should and should not have / Properties of Concrete at Harden State

What Properties Harden Concrete should and should not have / Properties of Concrete at Harden State
In the 👉 Previous article we have learned the properties of fresh concrete, now we will know about the properties that harden concrete should and should not have.

Picture of harden concrete

After the final setting of concrete and sufficient curing of the concrete should achieve some specific properties to sustain the structure. Some of the properties that harden concrete should have are listed below –
  1. Comprehensive Strength :
Concrete at the Harden state must achieve minimum compressive strength to resist the stress coming on it and resist the heavy loads of the structure. Concrete is designed to achieve some strength category Like M15, M20, M25, M30 etc. (MX) where M stands for Mix and ‘X’ means compressive strength of concrete after 28 days of curing. In any case, the strength of Concrete should not be less than 15.5 N/mm2
2. Durability :
The Harden Concrete must be durable enough to resist the effects of harsh environmental like rain, forest action also wear and tear. The property of fresh concrete that has the most impact over Durability of concrete is water cement ration.
3. Impermeability :
Impermeability of concrete that property which makes the concrete water resistance i.e. resist the entry of water into the concrete and structure. Sometimes a water tightness criteria of concrete is enhanced with suitable admixture mixed with concrete.
Now let’s talk about the Properties of Harden concrete that it should not have –
  1. Shrinkage and Creep :
When fresh concrete undergoes the hardening process it has a tendency of reduction in its volume this results in shrinkage. Shrinkage is generally observed with the shrinkage crack which leads to the less bonding, less strength and finally failure of the structure.
The process of drying (like no curing) and high water-cement ration is the main reasons for shrinkage.
     Creep is the deformation of the hardened concrete when it is subjected to continuous strain or by its own weight. Creep is a time dependence i.e. when concrete is undergone strain for a considerable period of time. Creep is observed by a deep crack in the concrete. Loading condition is generally responsible for creep.
2. Thermal Shrinkage :
Like every material concrete also expand in volume when it is subjected to heat, but harden concrete is not an elastic material so when it undergoes in the heat it cracks itself, also known as thermal shrinkage. The hardened concrete should have a minimum thermal expansion to resist fire and heat.